
Tags
Before Getting into the first program you may need to refer the “Intel Edison Getting Started Linux” to get started if this your first look into Intel Edison.
This Blog “Intel Edison Arduino IDE programming Linux” will guide you to write/use the first program in Adrunio IDE in Linux Platform.
Introduction:
Intel Edison cannot be used as a standalone unit or hardware. To make it functional, we need some kind to breakout broad by which we can power Intel Edison and other interfaces can be used.
Officially there are two supported breakout boards in market.
- Arduino Breakout with all interfaces as explained in “Intel Edison Getting Started Linux” blog.

- Mini Breakout board with minimal features.

Installing Arduino IDE in Ubuntu Linux:
Step 1:
- Download the supported Arduino IDE from Intel website.
- Extract the Arduino ZIP file.

- Extract in Ubuntu (You can also use “unzip” in CLI)


Step 2:
- Install java. Arduino needs ‘java‘ to run.
- If ‘java‘ is already installed in your system, you may see the below screen.

- Else, you can install ‘java’ by running ‘sudo apt-get install default.jre‘ package.

Step 3:
- Navigate into the path in Command Line or Terminal
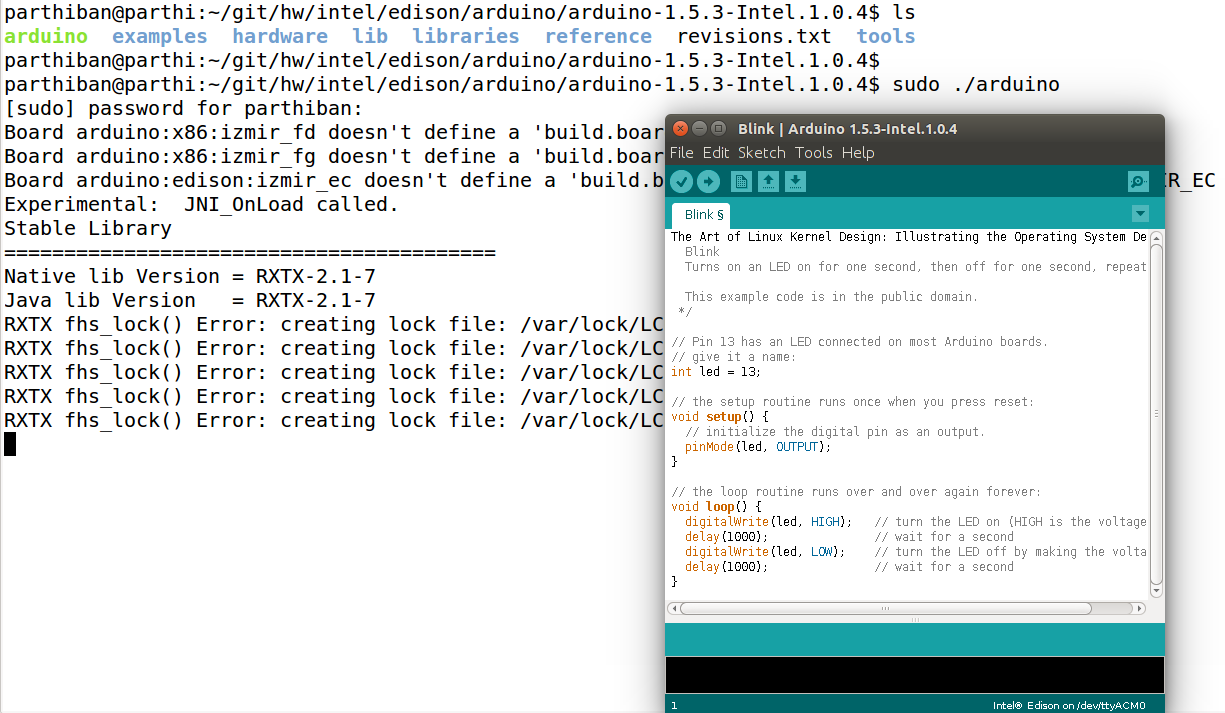
- Run the ‘sudo ./arduino‘ file.

- This will open up the Arduino IDE Graphically.
Step 4:
- Select the blinking LED example by navigating into “File -> Examples -> 01 Basics -> Blink“
Step 5:
- Configure the Board type as “Intel Edison” under “Tools -> Board -> Intel Edison“

- Configure the serial port as “/dev/ttyACM0” under “Tools -> Serial Ports -> /dev/ttyACM0“

- Note: Connecting two Micro USB to USB in PC/Laptop is mandatory here. Refer “Getting Started” guide for better pictures.


Step 6:
- Upload this program to Intel Edison. Click Upload button or ‘Ctrl + u‘ or “File -> Upload”
- This uploading process includes compilation and uploading.


- The above four images explains the various stages. Refer End of this blog for errors.
Step 7:
- Now the LED 13 on Arduino breakout board should be blinking (with 1second in on state and 1second in off state).
- You can also verify this by logging into Intel Edison over serial console (via minicom). Refer Getting started guide to know how to connect Serial console using minicom.

- In the above image, sketch directory will contain the latest uploaded sketch (ELF) file.
- Process listing shows the “sketch.elf” is running. This process is started by “clloader” daemon which watches the zmodem.
Beware of Errors:
- They are two most common error in Arduino IDE programming.
- Missing the “Board type” selection under “Tools -> Board” i.e. in this case “Intel Edsison” and Missing the Serial port selection under “Tools -> Serial Ports” i.e. in this case “/dev/ttyACM0“
- If you are using both Micro USB (one for programming and other serial debug using minicom), you will see two serial ports under “Tools -> Serial ports” i.e. “/dev/ttyUSB0” and “/dev/ttyACM0“. Serial port should be selected as “/dev/ttyACM0“. Selecting “/dev/ttyUSB0” here will result in Upload Error i.e. “Transfer Incomplete“. Refer this failure log for more details.
Refer this article to understand the difference between /dev/ttyACM and /dev/ttyUSB.
Failure log snip:
rz-sh: rz: not foundroot@edison:~# B00000000123273-sh: B00000000123273: not foundroot@edison:~# Retry 0: Got TIMEOUT
Retry 0: Got TIMEOUT
If have done all the previous steps correctly, you might see a similar success log in your terminal (where you have opended/run ‘sudo ./arduino‘)
Future Blog will cover:
- How Arduino IDE i.e. controller code runs on Intel Edison platform?
- How sketches are automatically started using clloader?
- How “Blink Program” runs without “main” function?
Follow us for more updates : https://pgtux.wordpress.com/2014/11/12/how-to-follow-penguintux/
